Connect Claude (web & desktop app)
Who this is for: anyone using Claude at claude.ai or in the Claude desktop app, who wants Claude to work with their Dodil account. No installation, no code.
Using Claude Code in a terminal instead? That’s a different (simpler) route — see Connect Claude Code.
Before you start
- A Dodil account you can log in to at
id.dodil.io. - Custom connectors are a paid-plan feature in Claude. If you don’t see the Add button described below, check your Claude plan.
Step 1 — Open the Connectors screen
In Claude, go to:
Customize → Connectors
⚠️ This menu moved. If you look under Settings → Connectors, you’ll now see a note saying “Connectors have moved to Customize”. Older guides and blog posts still point at Settings — follow Customize instead. Inside the Customize panel, Connectors is one of the icons in the small rail on the left (next to Skills and Plugins).
Step 2 — Click Add
On the Connectors screen, click the Add button in the top-right corner. The Add custom connector dialog opens.
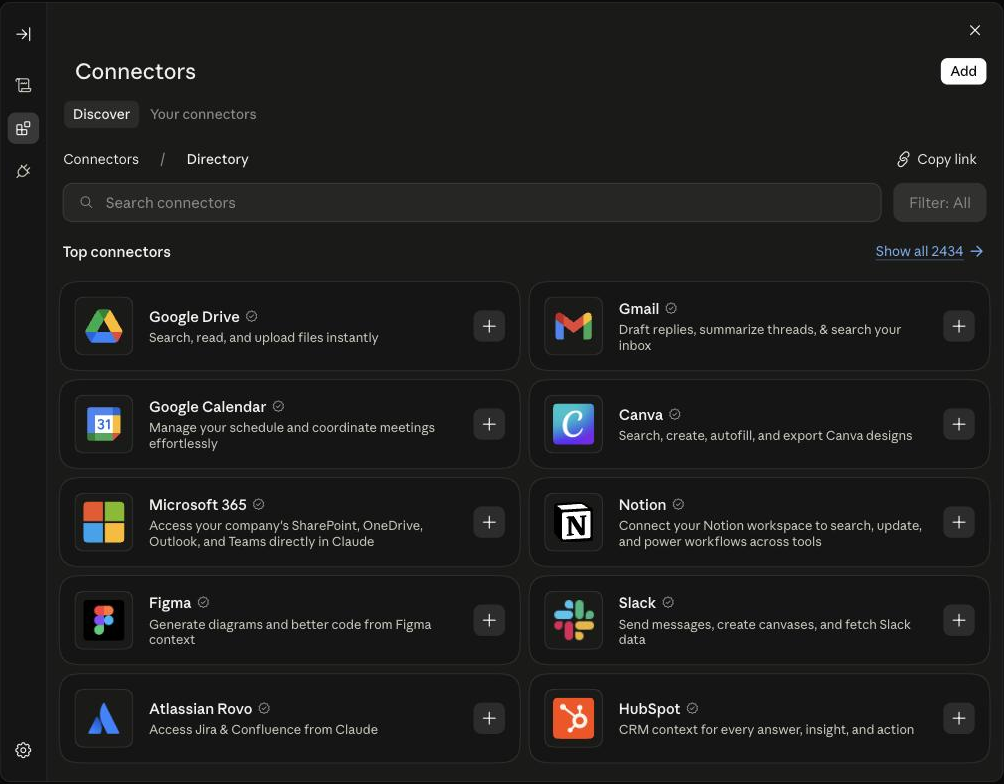
The Connectors screen. The directory of pre-built connectors is not what you want — Dodil is added with the Add button, top right.
Step 3 — Fill in the two fields
| Field | What to type |
|---|---|
| Name | Dodil — this is only a label; it’s what appears in your connectors list |
| Remote MCP server URL | https://mcp.dodil.io |
The dialog describes the second field as “The HTTPS address where the server accepts MCP requests” and shows an example ending in /mcp. Ignore the /mcp in the example — paste the bare address exactly as above.
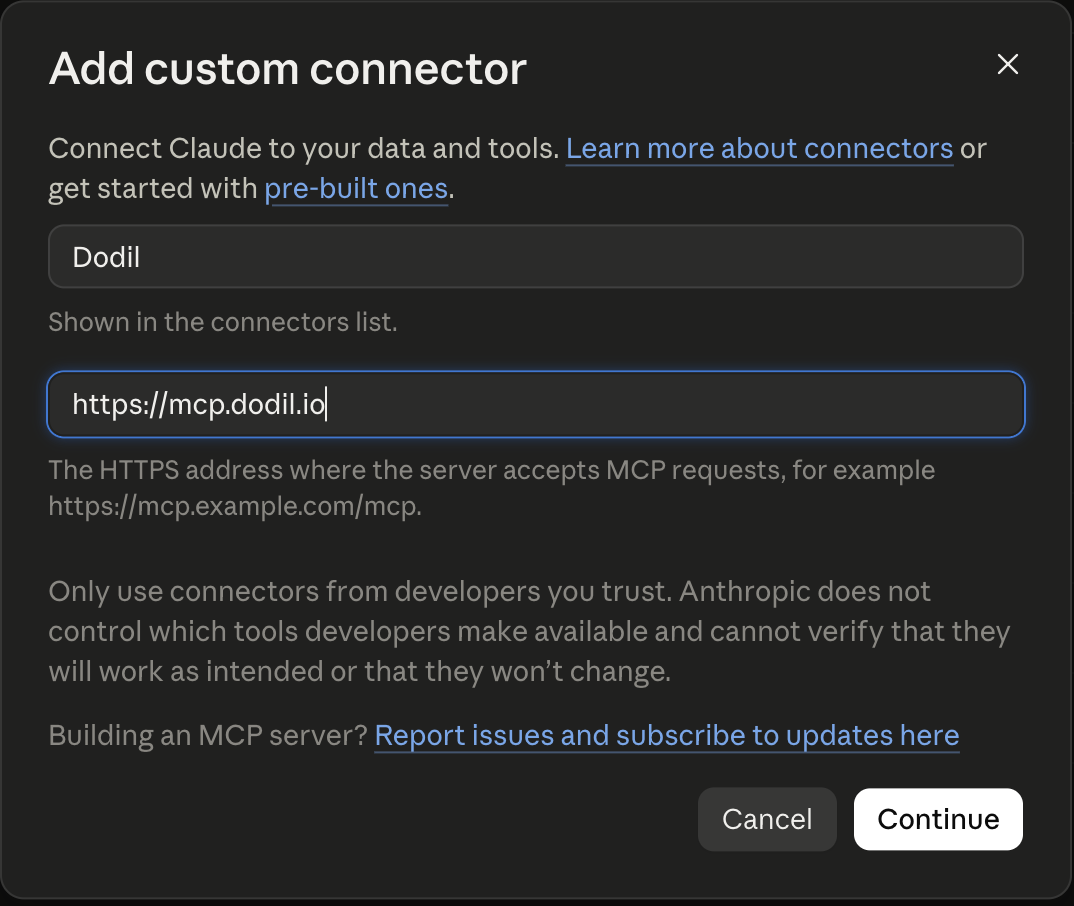
The Add custom connector dialog, filled in correctly. Name is just a label; the URL is the only value that has to be exact.
Then click Continue.
Step 4 — Choose the OAuth client option
After you click Continue, the dialog expands with two sets of choices: Authentication and OAuth client.
Just do these four things. The reasoning is at the end of this step if you want it.
1. Leave Authentication alone
Claude has already selected Always required, and that is correct. Don’t change it.
2. Under OAuth client, choose the third option
Click the circle next to “Use your own OAuth client” — the last of the three. Two boxes appear underneath.
⚠️ Do not pick the first option, even though Claude labels it Recommended and Detected. It does not work with Dodil yet. (Why: at the end of this step.)
3. Fill in one box, and leave the other empty
| Box | What to put |
|---|---|
| OAuth Client ID | dodil-mcp |
| OAuth Client Secret | nothing — leave it empty |
Your screen should look exactly like this:
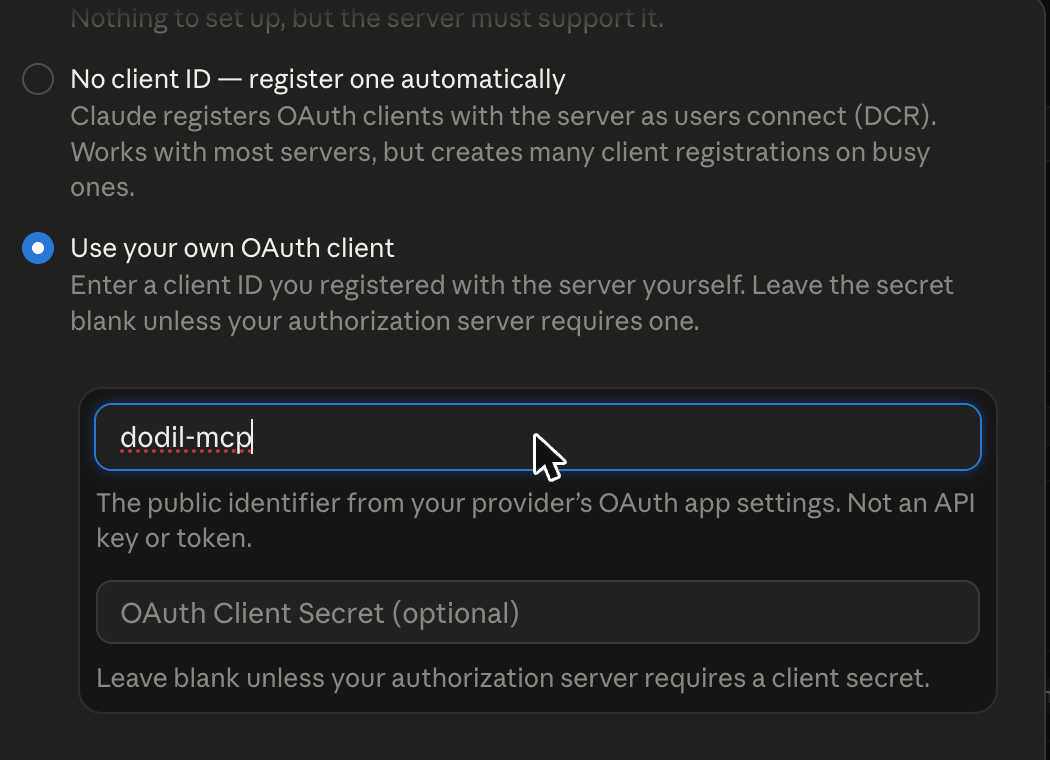
The Client ID box reads dodil-mcp. The Secret box stays empty — that is correct, not a step you missed.
4. Scroll down and click Add
Ignore Additional request headers and Advanced — Dodil needs nothing there. Click Add at the very bottom.
Nothing is saved until you click Add. If you close the dialog first, you’ll have to start again.
⚠️ Claude cannot edit these settings later. If you get it wrong, remove the connector and add it again from Step 2.
Is dodil-mcp a password? No.
It is the same for everyone and safe to share. It names the app (“this login came from Claude”), not you — a bit like Claude showing its own ID badge at the door before you show yours.
You still log in as yourself on the next screen, and you only ever see your own data. There is no secret to enter because there isn’t one: Claude and Dodil use PKCE, a one-time code check that makes an intercepted login useless.
Why can’t I use the first two options?
Both fail, and it has nothing to do with your account.
Dodil’s login service (Keycloak) has a known bug. Claude’s published app details mention a capability called jwt-bearer that Claude never actually uses here — but Keycloak refuses the whole registration instead of ignoring that one unused line. Options 1 and 2 both rely on those published details, so both hit it.
If you try them, you’ll see “We are sorry… invalid request” on the Dodil login page, or “Authorization with Dodil failed” in Claude.
It’s tracked upstream as keycloak#50362 . The moment it’s fixed, option 1 becomes the easy one — no client ID to paste — and we’ll update this page.
Step 5 — Log in and approve
After you finish adding the connector, click Connect on it. Then:
- A browser window (or tab) opens on
id.dodil.io. - Log in with your normal Dodil email and password. If your organisation uses single sign-on, you’ll see your usual company login here.
- A consent screen asks you to allow the connection. Click to approve.
- The window closes and returns you to Claude.
The connector now shows as connected in the Connectors list, with the Dodil tools available.
Step 6 — Check it works
Start a new chat and type:
List my Dodil buckets.
Claude will ask permission to use a Dodil tool the first time. Approve it. You should get back your buckets — or a clear “you have none yet” if your account is empty.
More things to try:
- “Show me my Ignite apps and which ones are running.”
- “Create a Dodil git repository called
invoices-api.” - “What container images are in my Dodil registry?”
- “Show the last 50 log lines for my Ignite app
checkout.”
Step 7 — Optional: stop Claude asking permission every time
By default Claude asks you to approve every single tool before it runs. That is safe, but after the tenth pop-up it gets tiring. You can switch it off for Dodil.
- Go back to Customize → Connectors and click Dodil.
- Under Tool permissions, find the row Write/delete tools with a number next to it.
- Click the dropdown on the right — it currently says Needs approval.
- Choose Always allow.
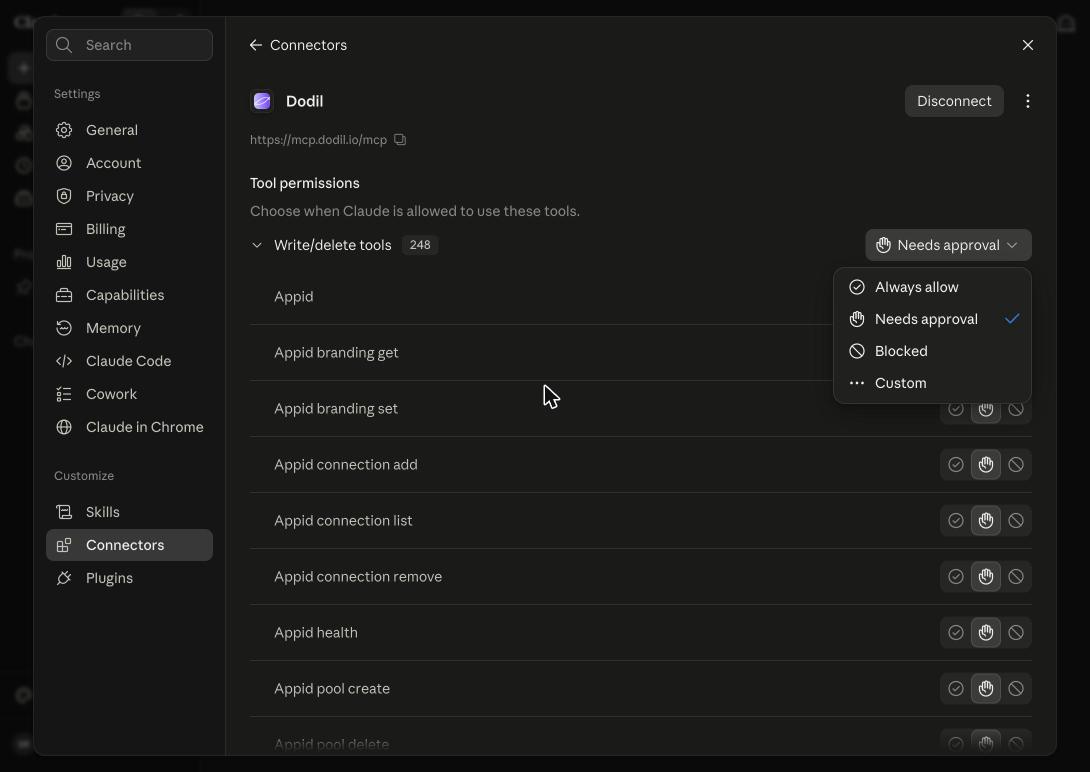
The dropdown sits on the right of the Write/delete tools row. Always allow is the top choice.
What each choice means:
| Choice | What happens |
|---|---|
| Always allow | Claude uses Dodil tools without asking. Smoothest. |
| Needs approval | You approve each action. The default. |
| Blocked | Claude cannot use these tools at all. |
| Custom | Pick tool by tool. |
⚠️ Think before choosing Always allow. These are write and delete tools — Claude could create, change or delete real things in your Dodil account without asking first. It is genuinely convenient, and it is genuinely less safe. If you are just exploring, leave it on Needs approval until you trust what Claude is doing. You can change it back any time, and Custom lets you allow the harmless read-only tools while still approving deletes.
Disconnecting
Go back to Customize → Connectors, find Dodil, and disconnect or remove it. Access stops immediately.
Troubleshooting
| Symptom | What to do |
|---|---|
| ”Connectors” isn’t under Settings | It moved — use Customize → Connectors. |
| No Add button at all | Custom connectors need a paid Claude plan. |
| The connector won’t add / errors on Continue | Check the URL is exactly https://mcp.dodil.io — no trailing slash, no /mcp, no typos. |
| It says unauthorized, or asks you to log in repeatedly | Tokens are short-lived (~15 min). Disconnect and reconnect the connector to re-log-in. |
| Connected, but Claude says there are no tools | Your Dodil user may lack permissions in your organisation — check Roles and Policies. |
| You picked the wrong OAuth option | Auth settings can’t be edited. Remove the connector and add it again. |
Full list → Troubleshooting.